
e-App Process
System Navigation
To access available applications, you can select the F&G Annuity or F&G Life Products in the lower ‘Online Applications’ section.
You can also hover over the ‘Forms & Materials’ tab to select ‘Online Applications’.
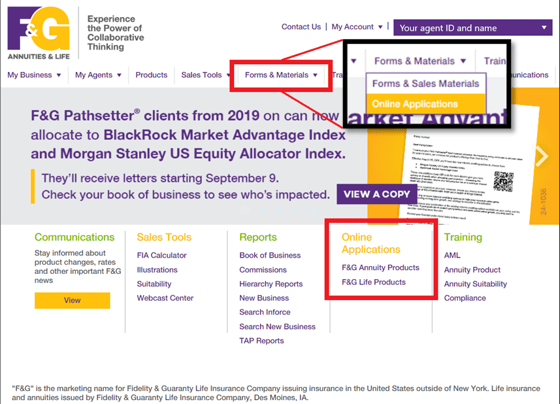
The ‘Online Applications’ link under the ‘Forms & Materials’ will bring you here:
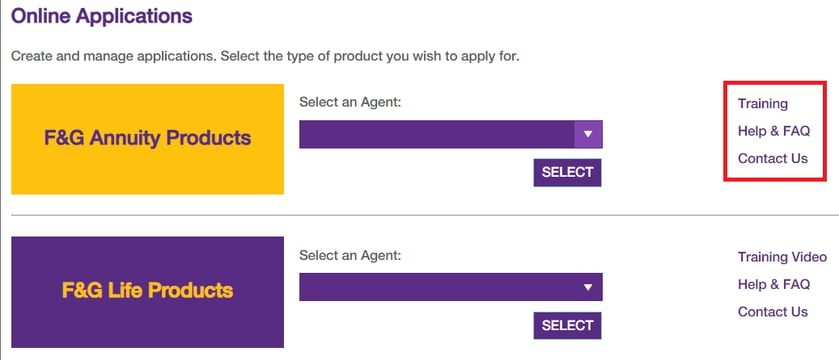
Notice the ‘Training’, ‘Help & FAQ’, and the ‘Contact Us’ options on the right. You can locate additional training and information thru these links as well as contact information if you require additional assistance.
NOTE: You may not see the F&G Life products depending on your appointment.
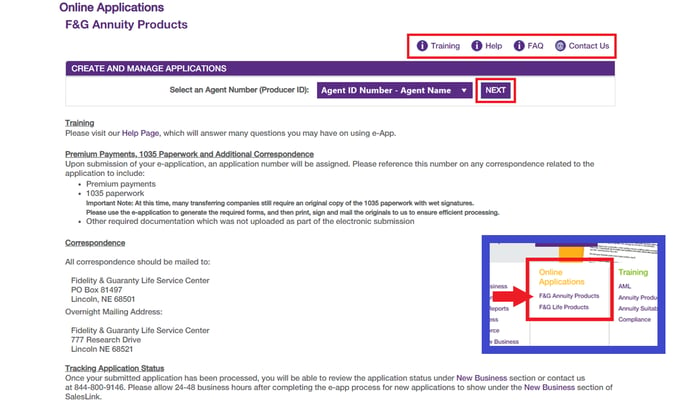
Clicking ‘SELECT’ will bring you to the landing page of the FireLight e-Application platform.
If you select the F&G Annuity Products on the lower side of the SalesLink screen you will see the page below. The assistance options are located at the top right and selecting ‘NEXT’ will take you to the FireLight form tool.
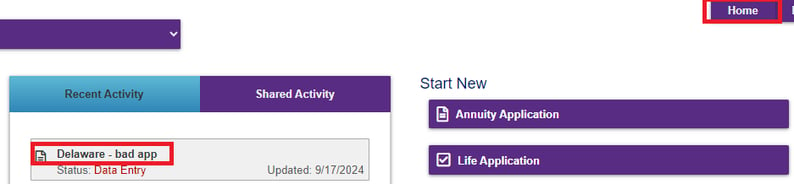
On this home page your recent applications will be shown on the left under the ‘Recent Activity’ tab. If you opened but have not completed an application, it will auto-save and show the status as ‘Data Entry’. Applications will be removed from recent activity after 60 days.
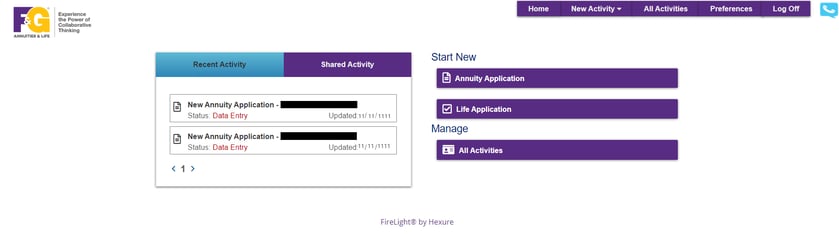
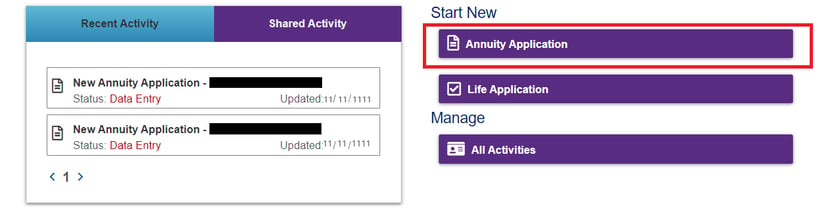
To start a new application, simply click ‘Annuity Application’ under ‘Start New’ .
Application Navigation
Once you have navigated thru SalesLink and arrived at the Firelight start page you can return to an old application or create a new one. Selecting ‘Annuity Application’ will prompt you for additional information before the application is able to be created.
The first piece of information required is to select the issue state under ‘Jurisdiction’.
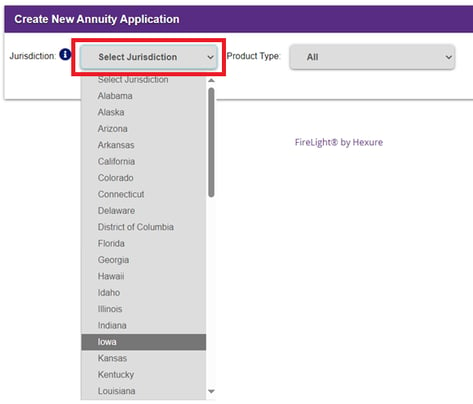
NOTE: This will need to reflect the state that the annuity is to be signed in and CANNOT be changed.
Product Type cannot be selected first due to variations based on state availability.

Once a state is selected you will see the list of available annuity products and be able to filter by product type.
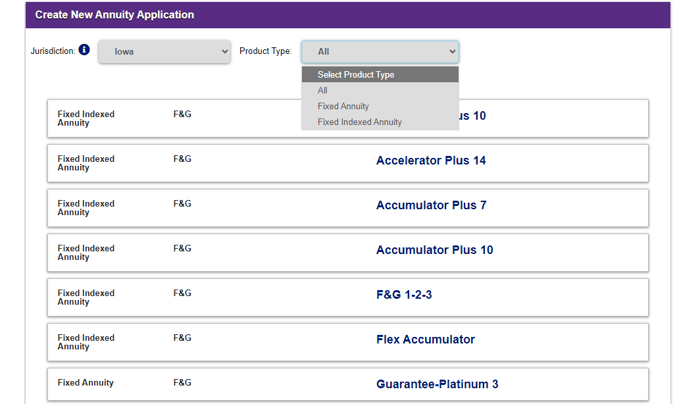
Once a product is selected a list of required forms will populate. These forms vary based on the state and product requirements. Be sure you look through the required forms to ensure the correct option was selected and populated. For questions on specific forms reach out to your presales team.
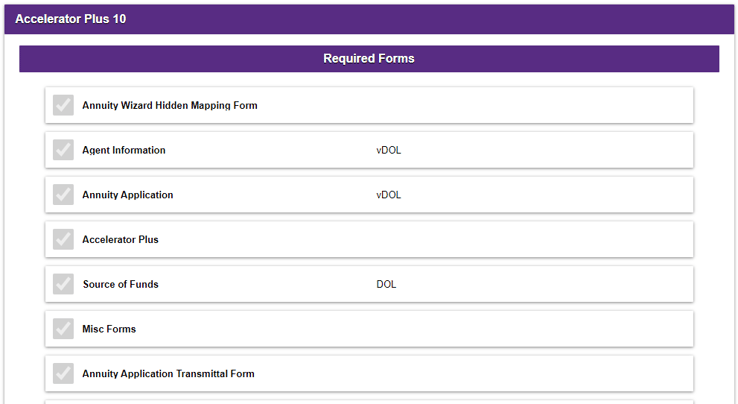
*Variations in forms due to the state or product selected may occur
NOTE: If the forms seem to be incorrect for the product or state, you should restart by going to the top right ‘New Activity’ tab and selecting Annuity Application once again.

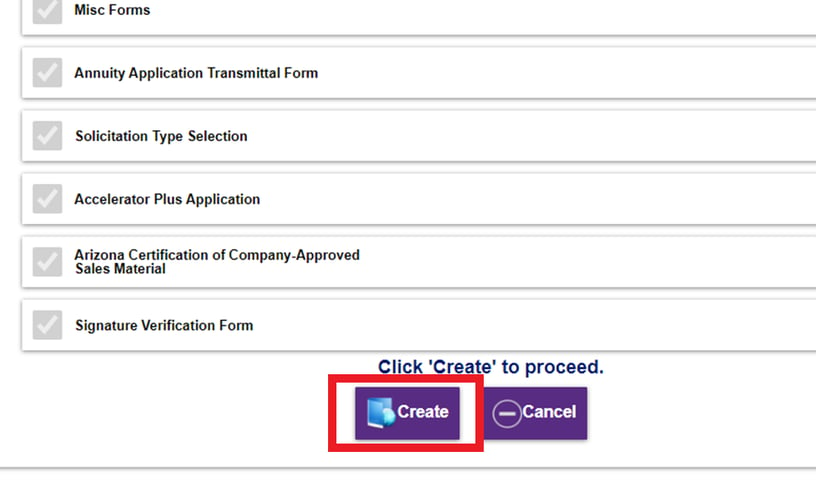
If all the forms listed look correct, start the e-App by selecting ‘Create’ at the bottom of the screen.
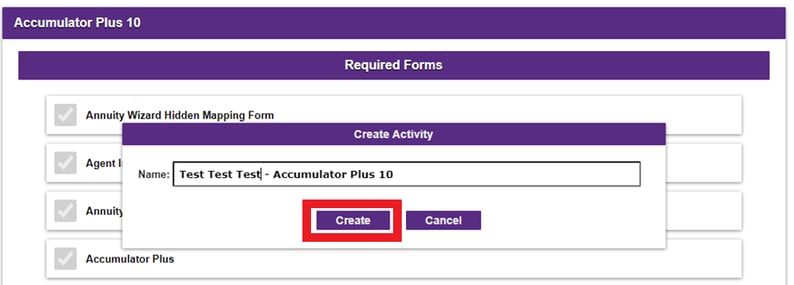
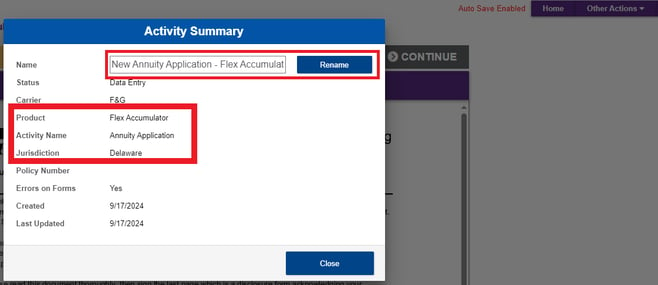
Once selected a pop up will appear asking for a ‘Name:’. You can label the application any way you want. The name will automatically default to ‘New Application-product name’, but feel free to change the name as you see fit. Application names often will include some of the client’s information, like name or deposit amount, so that identifying the correct application is easier.
Once the name is decided you select ‘create’ to begin the application. This is the first auto save. Whatever name was given to the application will now show in your recent activity.
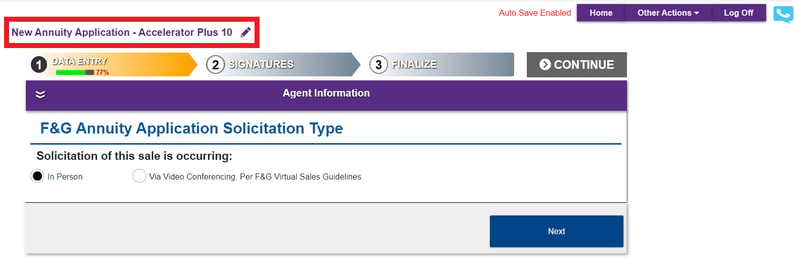
You will now be on the first page of the e-App. You should also see the red ‘Auto Save Enabled’ on the top right of the screen next to the ‘Home’ option.

Before you advance, there are several important things to note on this screen.
First, you want to confirm the correct application was generated. This can be done via one of two methods:
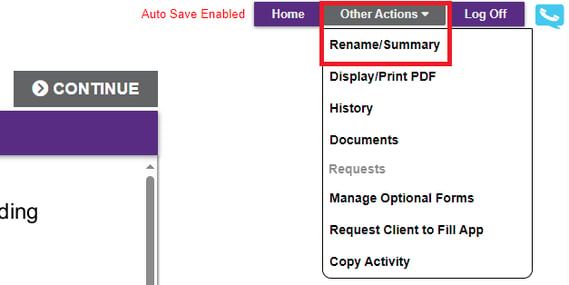
(Option 1) Select the pencil icon next to the application name
(Option 2) Hover ‘Other Actions’ in the top-right menu and select ‘Rename/Summary’ from the dropdown.
NOTE: There is NO WAY to change the product or State at this point. If you continue without checking the entire application could be rejected.If the information is not for the product or Jurisdiction needed select home and start over. If information has already been entered see: How to copy an application
You can change the name of the app in the Activity Summary where you confirmed the Jurisdiction.
You can return to the main page and start a new application by selecting ‘Home’ in the top right. The unfinished application will not cause any issues and will drop off the recent activity eventually.
Within the e-app wizard, pay close attention to the information at #1, the Data Entry step of the progress bar.
This bar tracks your progress in filling out the application. The e-App will not generate until the “Data” bar shows 100% complete. This example is at 77% and the continue button is greyed out.
If you click on the percentage, it will show a list of the specific required fields that are missing and allows you to select them for easy navigation thru the e-App.
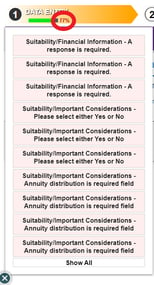
NOTE: If the data entry bar is not at 100% you will not be able to select continue. Selecting continue will not tell you what is missing. It will merely be unresponsive.
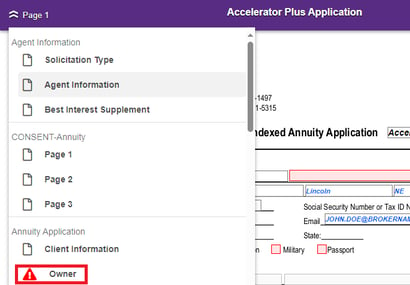
For a more detailed view of the required fields and forms to complete at this step, click on the arrows/chevrons under Data Entry.
Once selected you will see a list of the different forms and their sections. The red exclamation point icons show you what areas still need to be filled out. You can jump to any area or page immediately by clicking on the corresponding exclamation point.
Lastly, note the red chat balloon under the gray ‘CONTINUE’ bar.
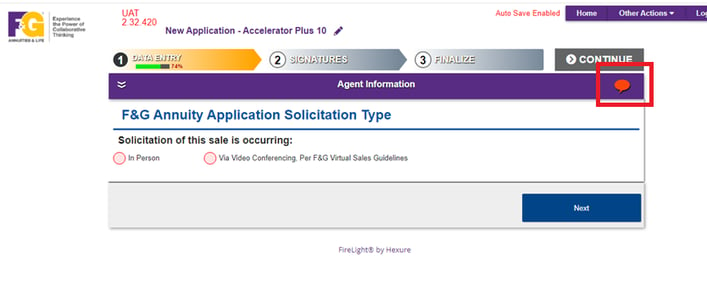
That balloon will appear if any inputs are still required on that screen. To assist in ensuring the information is not missing on any form be sure that the red chat icon has disappeared before advancing. If you click on the icon, it will show you what selections or questions need to be filled out on that screen.
Some options like ‘Via Video Conferencing’ may cause additional information to populate and be required.
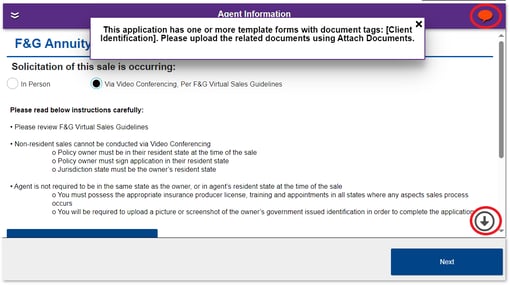
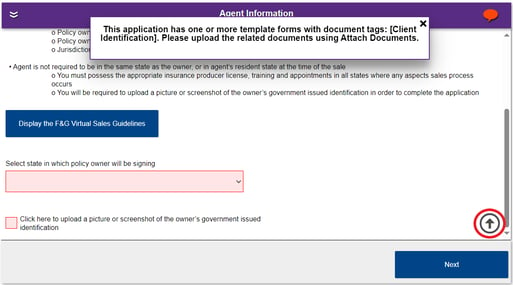
If any option is incorrectly entered, you can correct the selection and the information no longer needed will disappear and not be required. This can also result in information entered further in the form to be erased so ensuring correct selections and avoiding placeholders in the form is recommended.
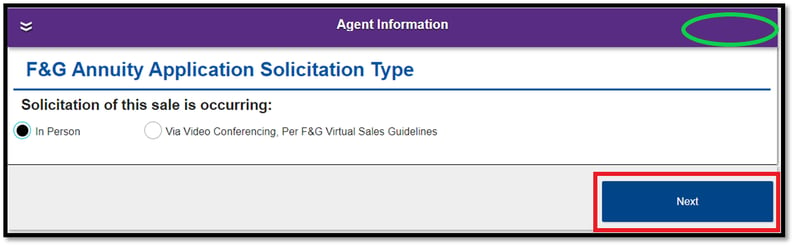
If ‘In Person’ is selected or all required information is entered, the red chat icon will disappear.
Once you hit next, you will be taken to the agent information page. Required questions are marked in red.
Agent Information
Here you'll want to validate that all the information is correct, especially phone number and email. This ensures the case manager can contact you to avoid any unnecessary delays in application processing.

Once your personal and contact information is entered you will put in your split percent.
If you are the only (i.e. the primary) agent, the split percentage will be 100%, so you enter 100. Multiple agents can be listed so the number of additional agents is required even if there are 0.
Up to 3 additional agents can be added totaling a maximum of 4 agents on the e-App. For all additional agents you must enter producer and contact information.
The split must be a whole number and the sum of all agent splits must equal 100%. An agent cannot be listed with a 0% split. Decimals are not accepted, only a whole number between 1 and 100 are allowed.
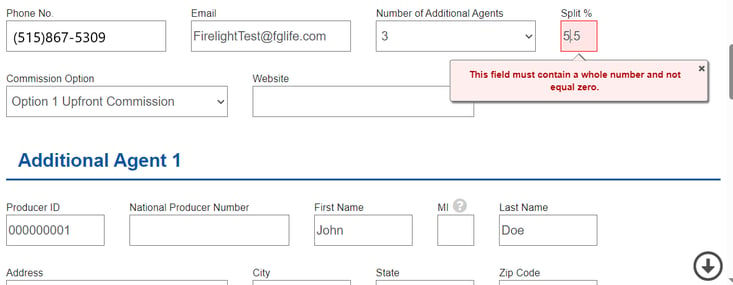
Ex. If you are splitting between 3 agents (writing agent plus 2 additional) and want it to be equal, the closest it can be split is 33%, 33%, and 34%.
Once all agent information is filled out, select ‘Validate’. This operation confirms licensing and appointments and may take a minute or two to complete.

Do not close the application or window during this process. After Validation completes, click “Next” to advance to the next screen.
NOTE: If this error message is received, contact Licensing and Contracting at 800-445-6758 (option 4).

The e-App will allow you to continue if not all agents are able to be validated. The application will not allow you to complete and submit without all agents listed passing validation. Validation can be run multiple times and agents can be removed if needed.
Additional Pre-application Information
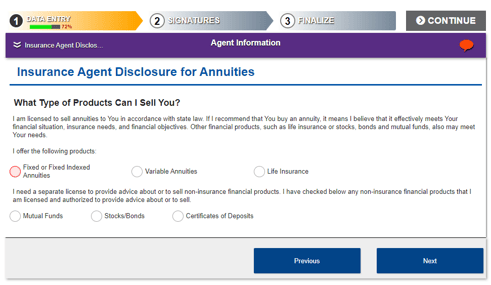
Next the agent needs to select all products they currently offer. This is for what they can offer at this moment in time not past or future. For multiple agents select all options that apply to any agent that is listed.
Client Information Section
The next section is Client Information. Starting with the type of ownership, plan/market type, and whether this is a replacement.
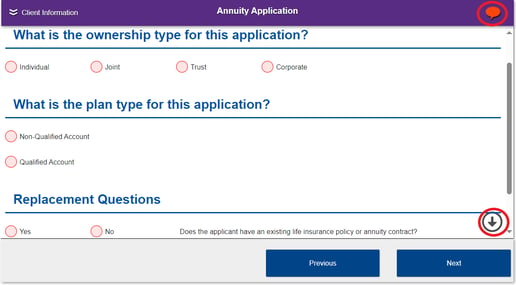
Common not in good orders for this section include understanding the difference between an IRA qualified plan over 59 and a half with no surrender penalties, and fixed indexed annuity or variable annuities not subject to surrender charge.
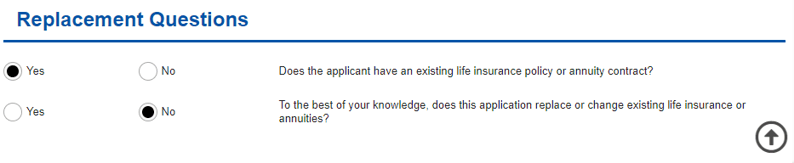
If the replacement is a qualified plan that is an IRA, Roth, SEP, 401(k) or TSA, but is in an annuity, you need to make sure it's listed as an annuity. Otherwise, other forms may not generate correctly within the application. If you have any questions or are confused about this, please contact your IMO.
NOTE: Based on the ownership type some additional information or limited market selection may apply. If you are not able to select the desired market or ownership, you may need to confirm eligibility.
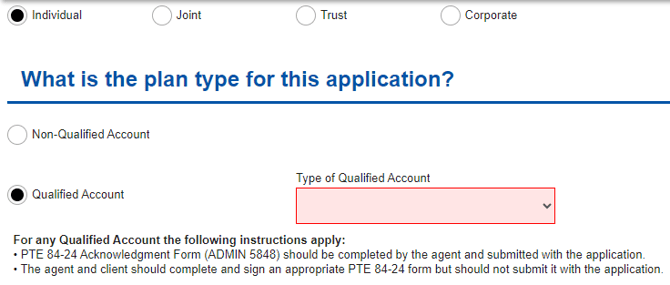
Market type will be asked later for the sources of funds. Rollovers/Transfers must have matching market types. If the type of qualified accounts do not match, additional tax forms and information may be required.
On the next screen you can use the Redtail or Whitepages to log in with your credentials allowing the F&G e-App to automatically download the owner information.
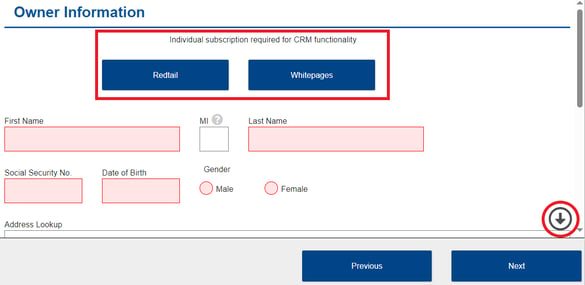
NOTE: For transfers and rollovers the ownership must be identical for all sources of funds.
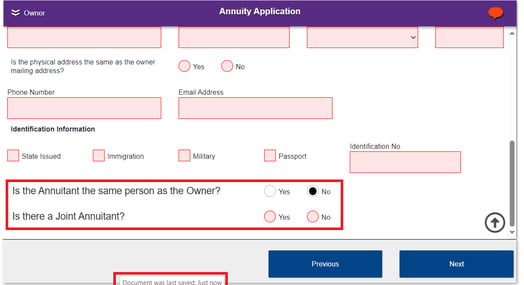
You can also enter the information manually if needed. At the bottom of the owner section you will be able to select if the annuitant is the same or if there is a Joint Owner when applicable. Not all options for ownership structure are available on all markets so the exact information displayed may slightly vary.
NOTE: The auto save feature will make a pop up at the bottom of the screen when the document is saved.
The next screens may be similarly laid out but for the joint owner and annuitant information if applicable.
After all information for owners and annuitant is filled you will arrive at the beneficiary section.
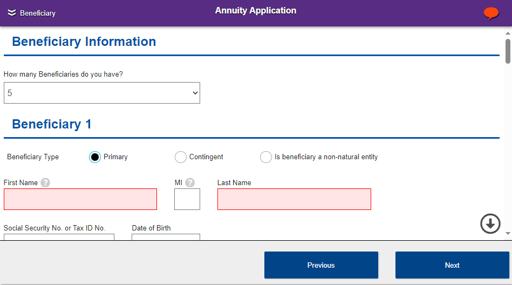
The e-App can accept a total of 16 beneficiaries, primary and contingent combined. The percentages must be in whole numbers. The e-App does allow for non-natural beneficiaries like testamentary trusts.
If 16 entries are not enough or if the client wants to ensure equal distribution or elect ‘per-stirpes’ a beneficiary change form can be uploaded along with the application. Confirm with your case coordinator how any specific beneficiary information or distinctions can be specified if not available on the form.
View Change of Beneficiary Form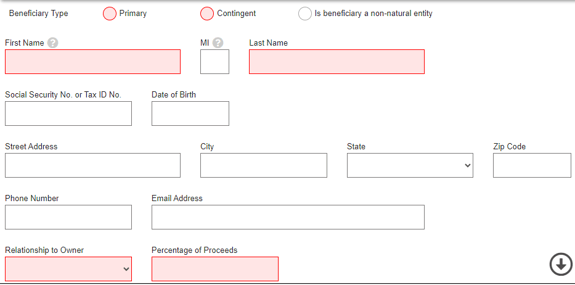
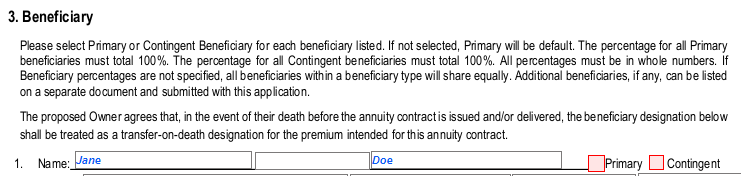
The red sections are the minimum requirements to list someone as a beneficiary. Name, relationship and percentage of proceeds are all that must be entered for a beneficiary to be accepted. You must also enter at least 1 Primary beneficiary.
NOTE: It is highly encouraged to enter as much information as possible even though it is not technically required. Additional information like Date of Birth ensures claims are processed as quickly and smoothly as possible to the intended beneficiaries.
The next sections depend highly on what product is selected for the percentages and specifics, but the layout for other products will be similar. For specific product application assistance contact your case coordinator.
Product Information
The first page will usually be ‘Strategies and Riders’, starting with Surrender Charges. The options shown here are for the Accelerator Plus 10 so the only surrender option is 10 years. Based on the product and state, the percentages and duration can vary.
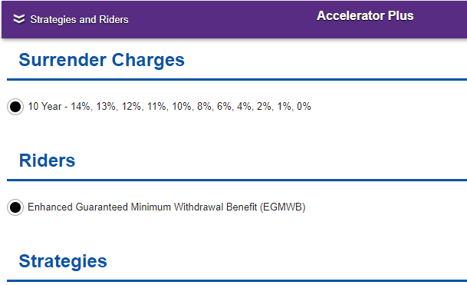
The Rider section will show any death or income benefits that are included or available with the product. Once again, the options shown will vary based on product and state.
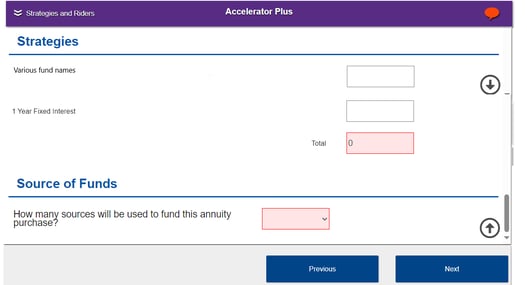
Below the Riders will be the section to allocate the funds by percentage into the available strategies.
Whole numbers must be entered into the various options until the total reads exactly 100. There may be minimums and limits on the available options so refer to your IMO for product specifics.
The last option on this screen is disclosing the number of sources that will be funding this annuity. The maximum number of sources you can enter is 9. Click ‘Next’ once the red chat bubble disappears confirming all required information has been entered or selected.
The number of Funding Method sections are determined by how many source funds were entered on the previous page. Selecting previous will allow you to return to that option and correct if needed.
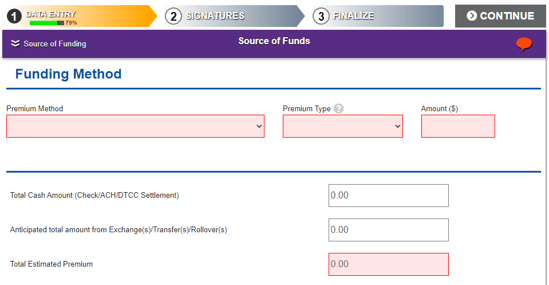
NOTE: For all rollovers and exchanges the ownership and market must be identical PRIOR to the transfer of funds. If the status of ownership or market is in question, refer to the existing contract prior to filing an application to ensure the options selected are available.
The only rollovers/transfers that do not create any tax documentation for the client are IRA to IRA direct rollovers. If a client receives the funds and forwards them on to F&G, a tax form WILL BE generated. The creation of a tax document DOES NOT mean that there are taxes due. See a tax advisor for any additional questions.
Suitability/Best Interest
The next 3 screens address Suitability and Best Interest, starting with Owner’s Information and Household Financial Information. Some states may have variations on specific required information, but the layout will be similar.
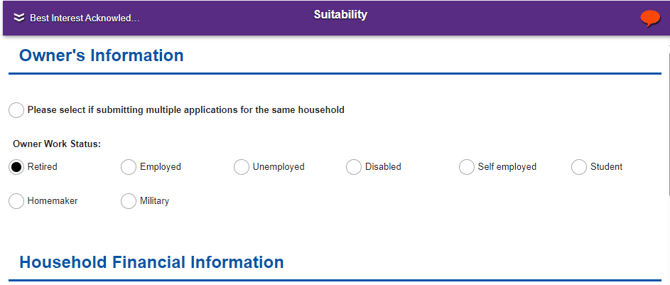
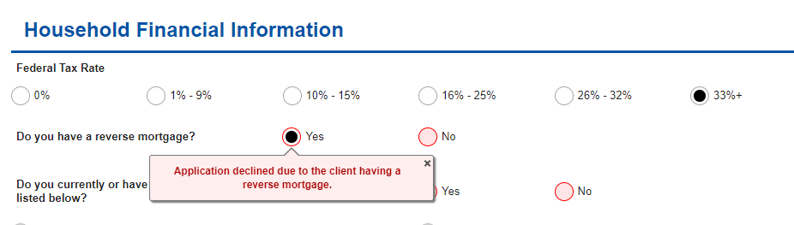
Certain options can result in a notice that an application is automatically declined. Ensure all information is entered accurately to avoid issues before selecting ‘Next’.
The second Suitability page requests more of the client’s financial information, risk tolerance, and reasons for purchasing an annuity.
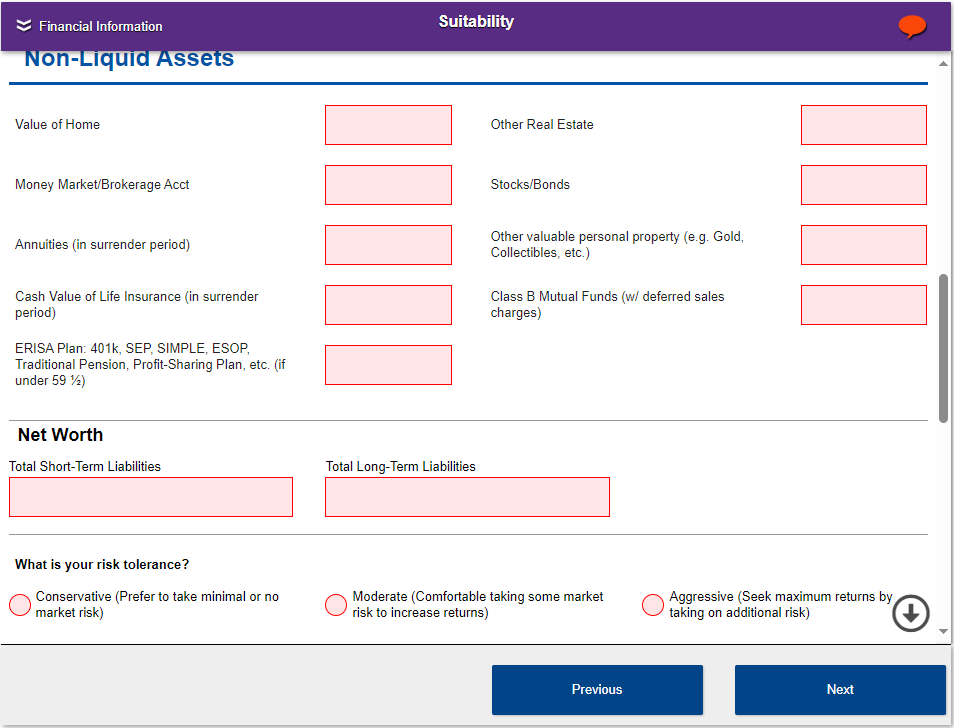
All asset and Liability information is required so make sure the red bubble in the top right has disappeared prior to advancing.

NOTE: Different selections will result in different information being required to ensure suitability questions are applicable.
For example, selecting no to the below question:
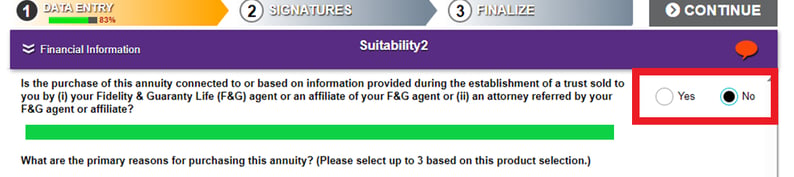
Versus selecting yes:

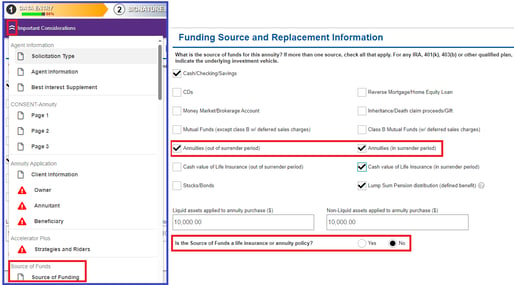
Once you have moved onto the next page you will once again select the type of accounts the funding is coming from. Double check that all applicable options are selected to avoid unnecessary NIGO’s. Even if answered previously in the application you must select all sources of funding.
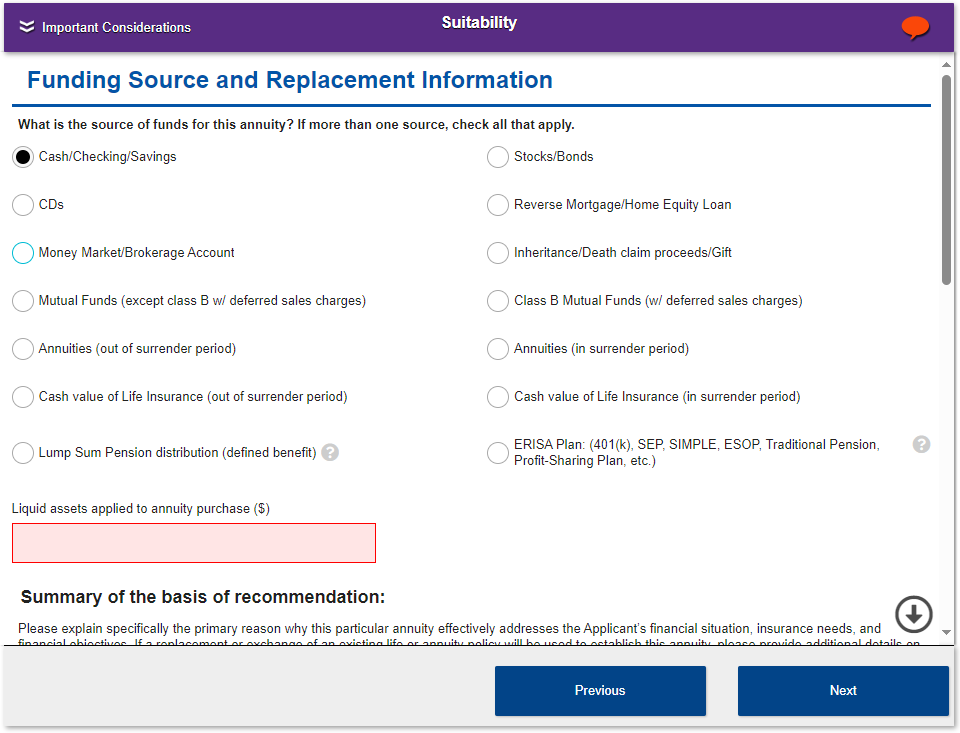
This screen can allow for contradictions so to ensure the information entered matches the funds section earlier use the chevrons under ‘Data Entry’ to navigate there. Once confirmed you can use the chevrons to jump to the sections still needing information indicated by the red exclamation point icon.
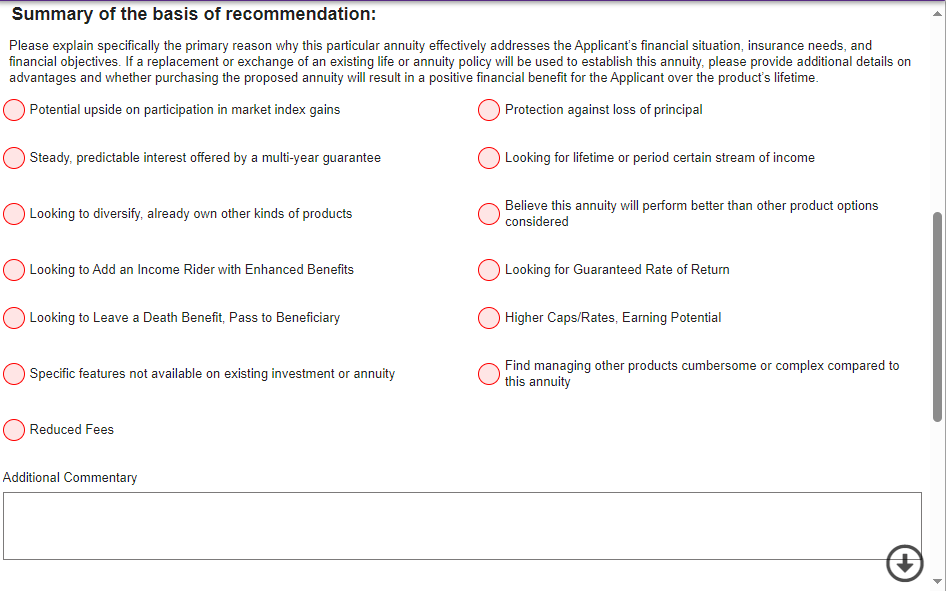
The following section is related to why you are selling this particular annuity. If this is an exchange or replacement, ensure it is clear that there is a ‘positive financial benefit’ to the client. Add any additional information in the commentary section if needed.
This next question can often be misunderstood. The specific question involves if the client plans on taking a withdrawal that WILL incur surrender penalties. This is not asking if the client plans to take any withdrawals just one that would result in fees being assessed.
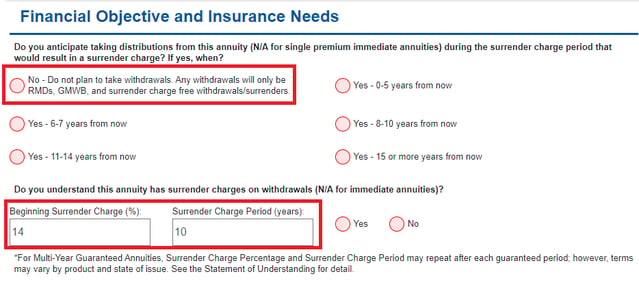
If your client plans to take funds that would result in a surrender penalty being assessed, the e-App will automatically decline and will not let you move forward.
Once all questions are answered you will proceed to the ‘Misc Forms’ section. The questions here refer to who will be signing and if any special instructions are being added.
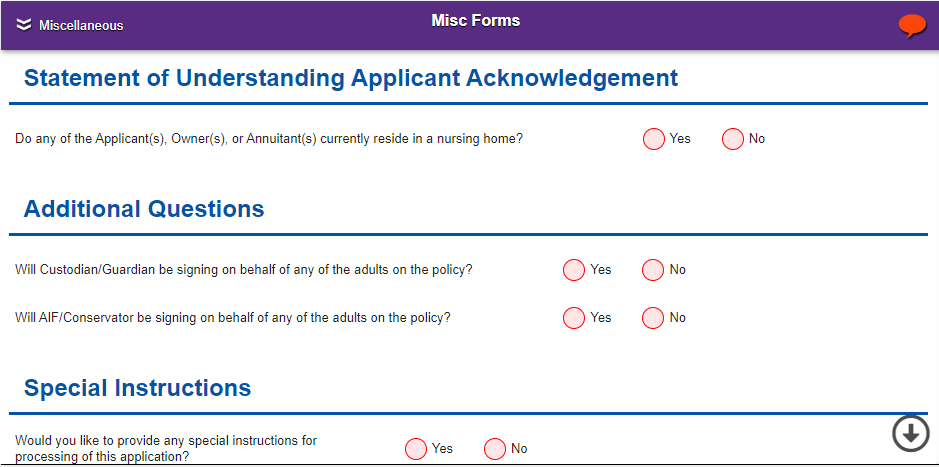
NOTE: Assisted living IS NOT the same as a nursing home. This specification can be important based on the product/benefits selected. If there is a question on whether the client’s residence is considered a nursing home reach out to your IMO/Upline with the information so that a determination can be made if needed.
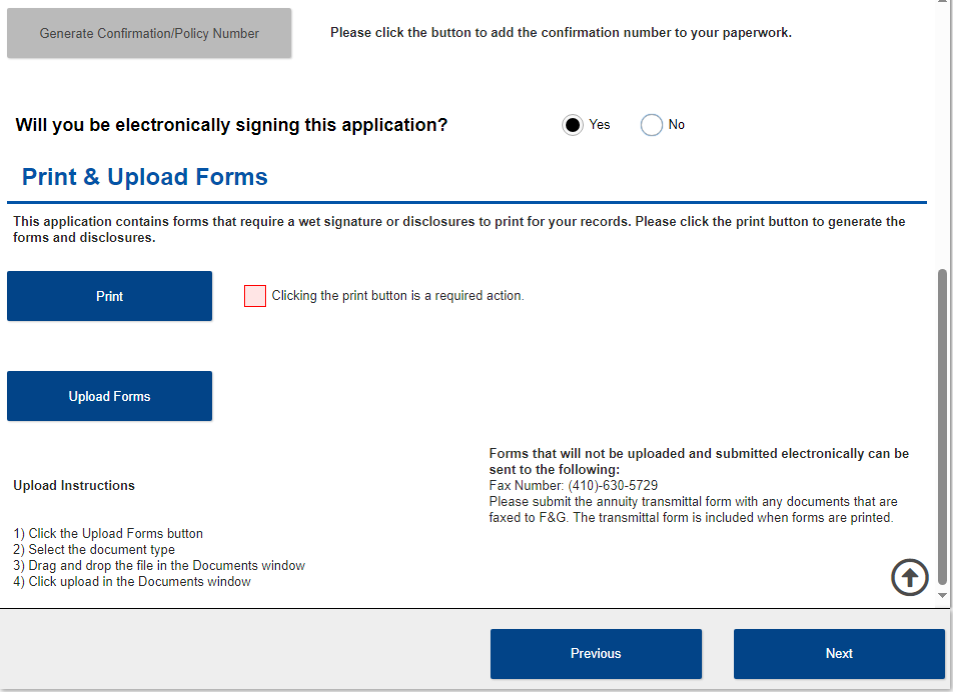
Midway down this screen, you will be asked to generate the Confirmation/Policy Number. The number will be automatically generated and added to your paperwork.
NOTE: This application number is needed to find information on SalesLink and when calling for updates. Make sure to write this number down.
Once the policy number is generated you proceed to how the contract will be signed.
Next you will be asked if you will be electronically signing this application. Choose yes or no, then click Next.
NOTE: Some states and brokers restrict e-signatures so refer to your IMO or Upline if unsure.
At the end of this section, the application contains forms that require a wet signature or disclosures for your records. Please click the print button. Exchange forms will print even when electronic signature is selected. Some carriers require exchanges to have a wet signature. Refer to IMO or Upline for questions.
The application will now populate with your client’s information. Make sure to review the information as you can still go back and correct if needed.
Once the application is printed if all information was entered correctly the e-App should be at 100%.
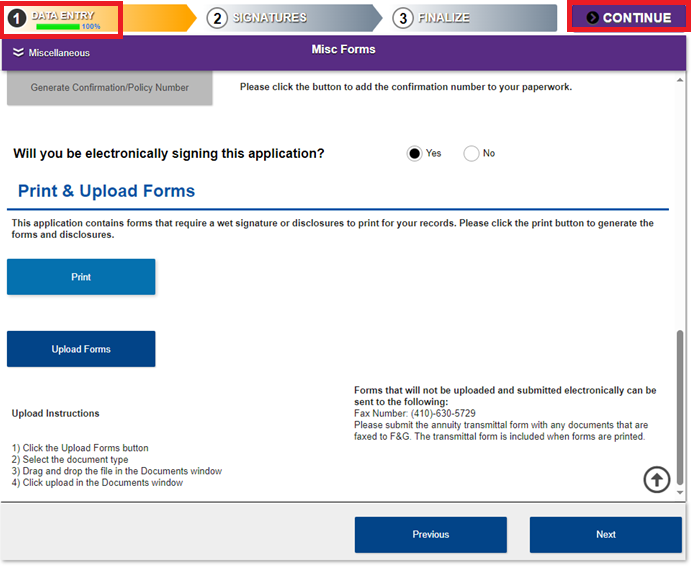
When an application has all the required information you can select continue in the top right to complete the application. The remaining pages in firelight are informational and filled out based on the information you entered. Once you have confirmed the application is correct click Next.
If you did not complete all the needed information, continue will be greyed out and not be able to be selected.

You can still select ‘Next’ at the bottom.
Remaining Firelight Pages
The next screens are the Annuity Application Transmittal form followed by a copy of the annuity application that had just been printed/downloaded.
First, you will be asked to review the Annuity Application Transmittal Form.

Then you will see the application. These pages will be filled based on the information entered previously. Any sections highlighted in red will need to be filled.
Information CANNOT be filled out on this screen. You must navigate to the section of the firelight form that asked for that information. In this case it is owner information so selecting the chevron you go to the first instance of ‘Owner’.
NOTE: If you had missed information, make sure to reprint the application.
The remainder of the pages are the disclosures and filled forms based on the information provided. Any incorrect information will need to be corrected in the sections listed before the Annuity Application Transmittal Form.
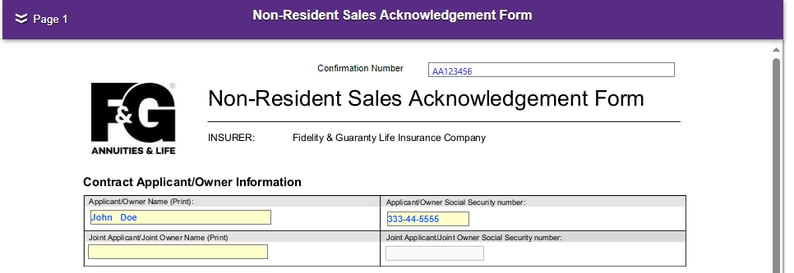
The Non-Resident form is an indication that the jurisdiction selected for signing does not match the resident state entered. Confirm the information entered in the “Client Information” section. If the client information is correct, then the state selected when the application was created may be the issue. Tou cannot change the application state, but you can copy the information in an application and update the product or state.
How to copy an application:
-
Select 'Home' from the top-right menu

Select 'Home' -
On the page you are navigated to, select 'All Activities' under the Manage heading

Manage activities -
Select 'Copy' on the desired application

Select copy button -
Select 'Copy with Changes' button

Copy with Changes option -
Select the correct jurisdiction and product

Select jurisdiction and product -
Create, name, and confirm application for the product and state desired

Confirm name and proceed with application copy 
Activity Summary view with details
Once the ENTIRE application has been reviewed and you do not need to change any information click 'CONTINUE' to proceed.

When you click Continue, you will see that ‘DATA ENTRY’ Now has a check mark indicating completion and we have advanced to ‘Signatures’.

Signing the Application
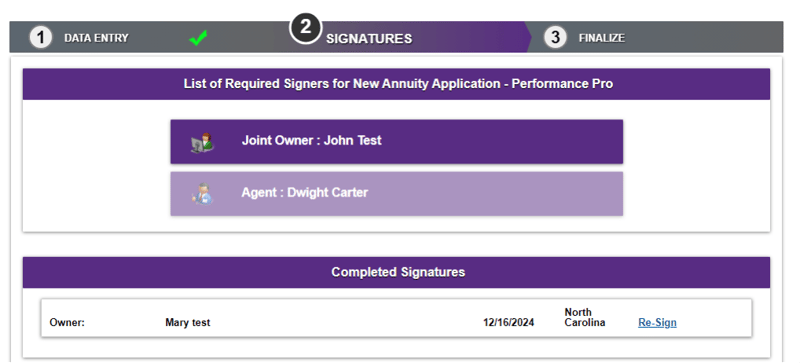
After completing Data Entry, the first screen will show the list of the individuals that are required to sign.
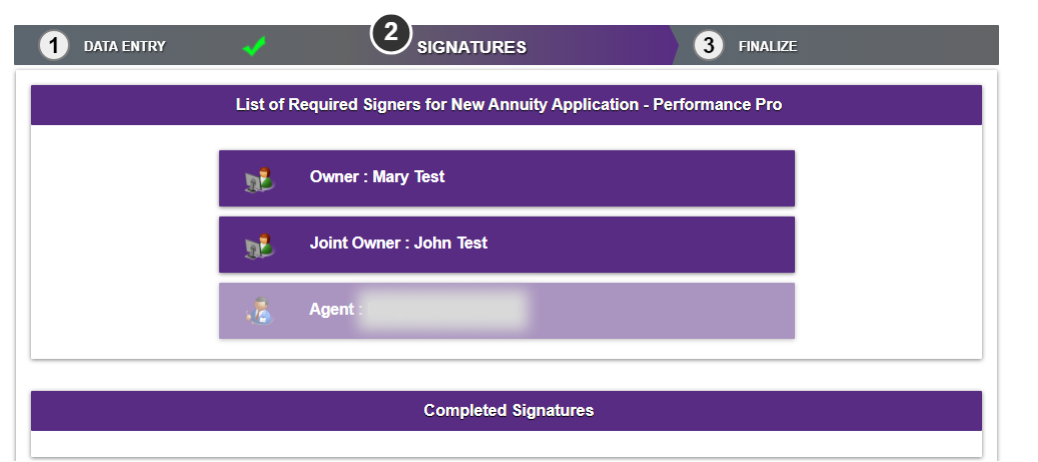
In this example, there is only one owner, the annuitant and owner are the same, and the client is signing on their own behalf electronically. That is why only one Owner, and the Agent are listed. For example, if there was a joint owner, a Custodian, or POA in effect those signers would be listed, and additional forms would need to be uploaded.
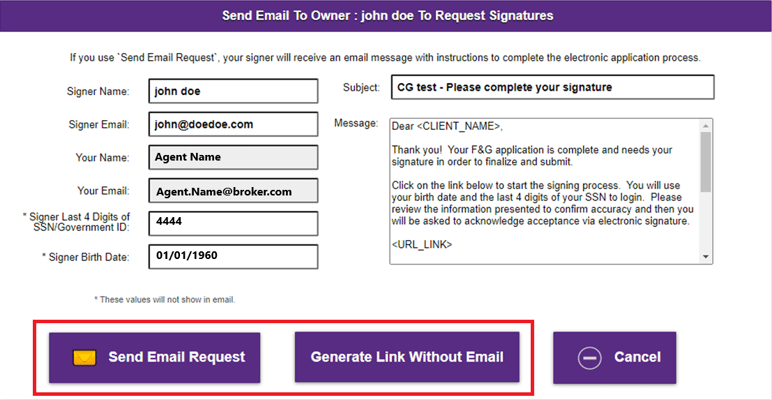
NOTE: Each client must also have their own email address for the e-App. The agent cannot use their own email for any clients. Consult with your client before creating the e-App in case an email needs to be set up. If an agent email is provided for the client the new business team will require that a new email address be provided before continuing with the application process.
When you select the owner, you will indicate whether they are signing now or if an email request is being sent.
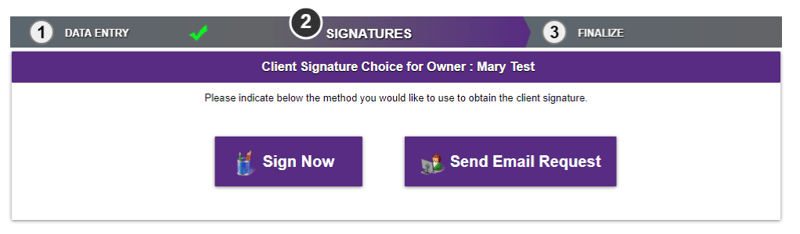
If they are not signing now you can choose to generate an email or send a link.
If they are signing now, enter their identification information.
NOTE: Expired identification IS NOT acceptable.
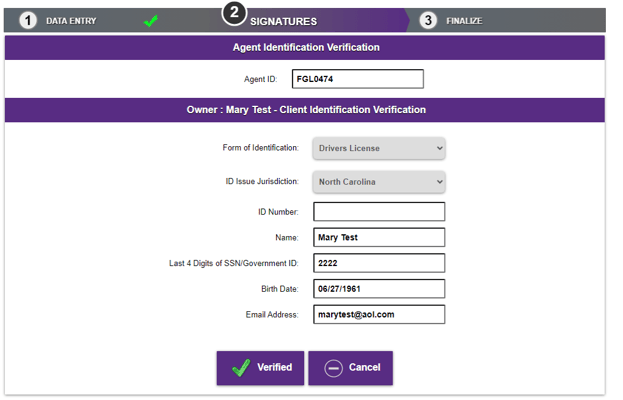
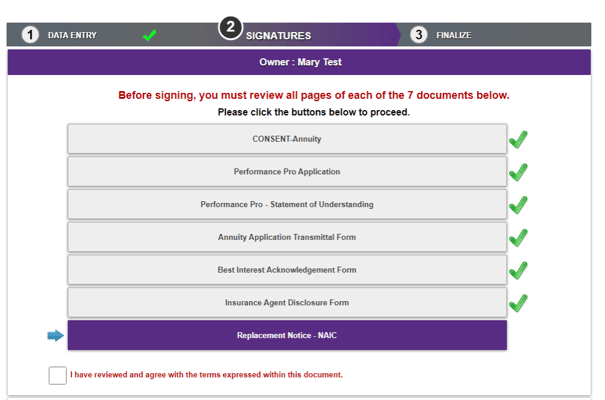
Once the information is entered and in good order you select the ‘Verified’ button. This will lead you to a page listing the documents that must be reviewed by the client prior to signing.
Once all documents are reviewed you will be able to select the ‘Sign’ option.
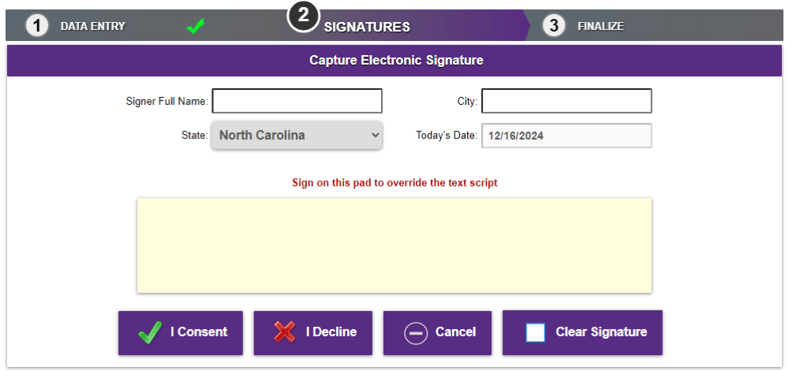
The client will complete their full name & city. They will also have an option to sign on the pad to override the text script. Once completed, they’ll select 'I Consent'
Next, the agent will sign. This process is identical to how it works for the client.
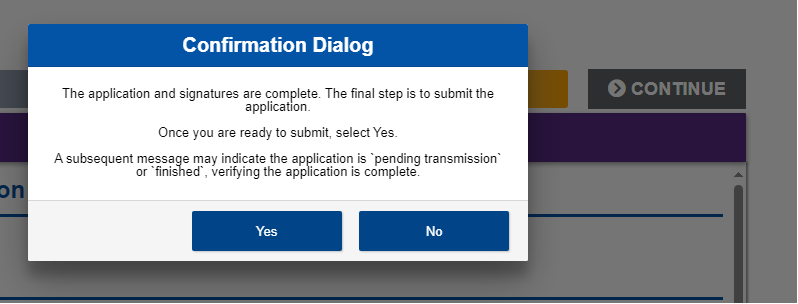
Once both the owner and the agent have signed/been sent a link a confirmation box will appear.
If you click yes, this will be submitted to the new business department for processing.
No further edits will be allowed. If you or the client decides not to continue the process you can click ‘No’. The application will not be submitted but will be saved. If the client decides to proceed the application will need to be re-signed.
This is the screen that will appear after an application had been fully completed.
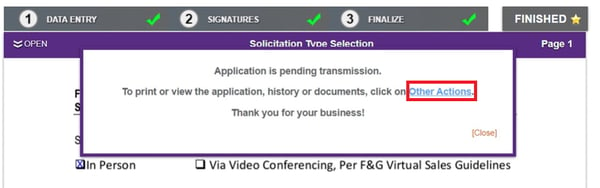
The top progress bar now shows all three sections with a check mark and the ‘COMPLETE’ button has changed to say ‘FINISHED’.
Selecting 'Other Actions' from the top menu will allow you to view the summary and an option to Display/print PDF so you can save a copy if not done so previously when selecting ‘Print’ was required. You can also select a specific document to print in case any copies saved earlier were lost or need to be in a separate document.

NOTE: Applications are saved under recent activity for up to 60 days on the Firelight e-app platform. Agents are encouraged to save copies of their applications for their records.
Some important notes to keep in mind:
- Allow up to 24 to 48 after the e-App submission for the application to populate a pending case within the New Business section of SalesLink.
- SalesLink will populate and show any notes from your case manager and requirements.
- The case manager will email you after their initial review.
If you do run into any technical issues with the e-Application or having any questions about your pending case, please contact our support team at 800-445-6758.
/Hubspot_FG%20Logo%20Name%20Purple%20Bkgd.svg "Hubspot_FG Logo Name Purple Bkgd")